This website content is intended for medical professionals only. Not for the general public.

PRODUCT APPLICATION
LOKUS Liquid Dressing conforms to the wound profile.
It is specially designed to assist in treating wounds, burns, ulcers, bed sores, and other large, highly exudative, or uneven wounds.
Application
Ideal dressing for the healing process in traumatic, acute, chronic, surgical, burn wounds, trophic ulcers, pressure injuries, donor and graft sites.
Can be applied on fresh wound or burn wound without prior treatment for emergency and temporary purpose only. Seek medical assistance thereafter, before reapplying Lokus dressing
Precaution before application
Stop bleeding first.
Clean wound and apply medication as per doctor’s prescription before applying Lokus Bandage/Dressing.
Must mix both Part A & Part B before using!
Attention
Avoid contact with the liquid foam during application for maximum performance!
Always keep the product away from children!
Relative Contraindications
(Pre-treat before applying Lokus Liquid Bandage/Dressing)
Suppurative Inflammations; remove exudates & treat inflammations.
Arterial & Venous bleeding; apply pressure or use a topical hemostatic agent to stop bleeding.
Pseudomonas Aeruginosa Infections; perform drainage, debridement and treat with topical antibiotics if applicable.
Necrotic Wounds; perform debridement and treat with an antimicrobial agent if applicable.
Sensitivity/intolerance to Lokus bandage; consult the doctor first.
Important
Part A & Part B of Lokus Liquid Bandage MUST be mixed before applied on wounds
This product is self-sterilizing once it is thoroughly mixed and during the application process.
Suggested Mixing Method
Cup Method
(Best for controlled / clean environment)
How To Apply Lokus - Cup Method - 1 Sachet
How To Apply Lokus - Cup Method - 2 Sachet
How To Apply Lokus - Cup Method - 3 Sachet
Easily Clean Up Lokus Mixing Cup
(A well mixed Lokus can be easily detached from a disposable plastic cup after it fully solidified)
Application Process For
Lokus Multipurpose Liquid PU Foamed Bandage
Before Applying Lokus Multipurpose Liquid PU Foamed Bandage
Product Application
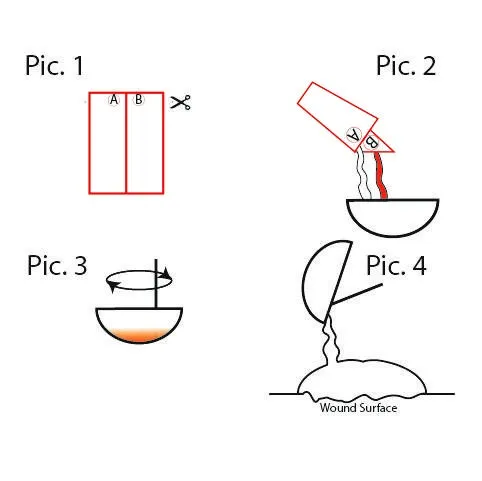
Step 1:
Cut/tear the top of the sachet as per Picture 1.
Step 2:
Squeeze out Part A & B into a sterilised plastic container as per Picture 2.
Ensure both Part A & Part B contents are squeezed out fully.
Step 3:
Stir the mixture of Part A & B with a stirrer in fast circular motion in the container (refer picture 3) for about 16 to 20 seconds until it's fully mixed when mixture turning white.
Step 4:
Scrape out the milky white mixture using the stirrer onto the wound starting from the healthy skin
(picture 4).
Step 5:
Cover at least 2cm of the healthy skin around the wound.
Step 6:
May need to use more than 1 sachet depending on the wound size and depth.
Step 7:
Bandage will self sterilize upon mixing Part A & B
